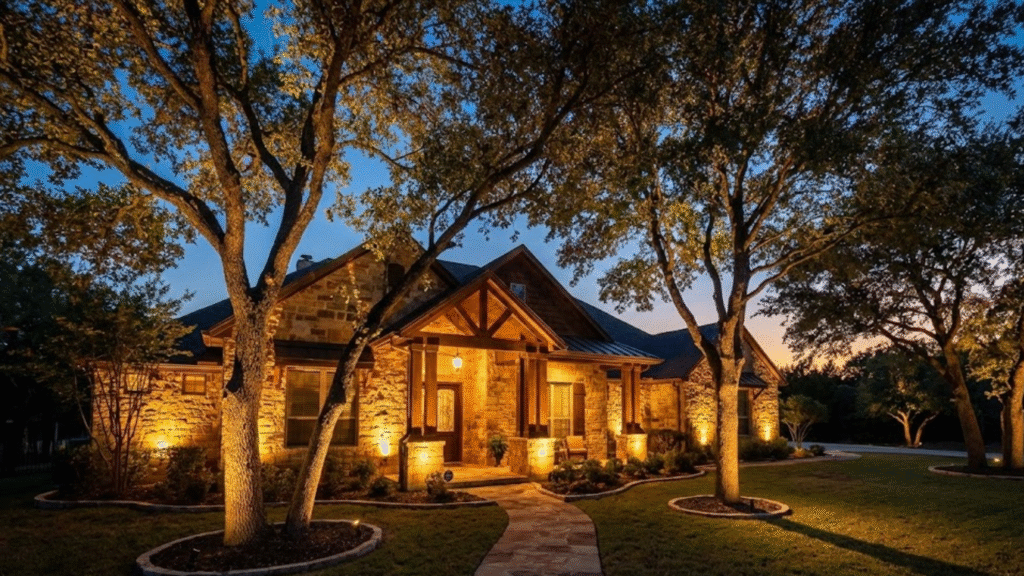
Uplighting places fixtures low to the ground and aims light upward to sculpt trees and architectural elements. Done well, it adds depth and cinematic drama while keeping glare — and distracting hot spots — out of sight. This guide walks you through how uplighting works, why hot spots happen, and the practical strategies—beam shaping, shielding, spacing, and multi-source layouts—that create even, comfortable illumination for landscapes and facades. You’ll get straightforward fixture-selection tips, placement rules for different tree shapes and building materials, and commissioning advice to confirm glare-free results. We’ll also cover how modern LEDs and smart controls save energy and preserve consistent scenes, and where professional design delivers measurable gains in safety, curb appeal, and ongoing maintenance. Below we define uplighting and its benefits, outline step-by-step methods to avoid hot spots, cover tree- and architecture-specific tactics (moonlighting, cross-lighting, wall washing, grazing), and explain Natural Concepts’ process with a clear path to request a free quote or consultation.
What Is Uplighting and How Does It Enhance Outdoor Spaces?
Uplighting is an accent technique that places fixtures at or near ground level and directs controlled beams upward to reveal form, texture, and silhouette. It relies on contrast — bright highlights against darker surroundings — to create perceived depth and to emphasize architectural lines or tree structure, extending the hours you can use and enjoy outdoor spaces while improving curb appeal. Good uplighting balances beam angle, lumen output, and color temperature so features look natural rather than washed out or harsh. Avoiding hot spots is essential to preserve a refined, glare-free presentation. The outcome is intentional, elegant drama that enhances aesthetics and also improves safety by lighting entries, steps, and uneven surfaces while keeping comfortable sightlines.
Natural Concepts brings focused, local expertise in custom landscape lighting to Houston-area homeowners. We’re family- and veteran-owned, deliver award-winning designs, and offer a complimentary quote and consultation to show how uplighting can transform a property. Our licensed crew and white-glove installation make professional design the practical next step after you’ve learned the basics — and our free consultation connects the technical principles above to fixture choices and placement tailored to your site.
How Does Uplighting Transform Trees and Architectural Features?
Uplighting brings out trunk texture, defines canopy edges, and layers silhouettes so plantings read clearly against the night sky. On buildings, it accents cornices, columns, and masonry, giving facades sculptural presence. The technique is selective illumination: a narrow beam emphasizes height, a medium spread reveals texture, and diffused light softens transitions to the background. The same fixture used differently produces distinct results — a tight spotlight at a column’s base creates crisp vertical emphasis, while a wider beam near a stucco wall reads as a continuous wash. Knowing how beam spread, lumen output, and color temperature interact lets designers dial subtle or dramatic looks to match client goals.
A practical way to preview changes is with small mockups or photomontages during design. Testing beam spreads in context reduces surprises at install and sets realistic expectations for the final effect.
What Are Common Uplighting Techniques for Trees and Architecture?
Uplighting relies on a handful of proven techniques — spotlighting, silhouetting, wall washing, grazing, and moonlighting — each suited to specific subjects and visual goals. Spotlighting uses focused beams to isolate trunks or details; silhouetting places lights behind objects to create bold outlines; wall washing provides broad, even coverage on facades; grazing uses low-angle narrow beams to emphasize texture; and moonlighting mimics natural light falling through a canopy. Technique choice depends on scale and surface: graze rough stone, wash smooth planes to avoid banding. Fixture selection follows the technique: narrow spots for columns, well lights or wide fixtures for large canopies, and shielded units wherever glare control matters.
On-site trials help you see how seasonal foliage and nearby surfaces change the result. That iterative process leads naturally into strategies for preventing hot spots and achieving glare-free scenes.
Uplighting techniques overview:
- Spotlighting: Focused beams to highlight trunks, statues, and columns with clean outlines.
- Silhouetting: Backlighting a subject to create a clear outline against a brighter background.
- Wall Washing: Broad, even coverage for facades and smooth surfaces to reduce texture emphasis.
- Grazing: Low-angle, narrow beams that accentuate stone, brick, and textured finishes.
- Moonlighting: Fixtures mounted in the canopy to create soft, dappled downlighting that reads as natural moonlight.
These tools let you layer scenes so one technique complements another; the careful balance of drama and restraint keeps transitions smooth and hotspots to a minimum.
How Can You Achieve Glare-Free Uplighting Without Hot Spots?
Hot spots and glare usually come from mismatched beam angles, too much concentrated lumen output, insufficient shielding, or incorrect fixture placement. The fix is straightforward: match optics to the object size, shield the light source from direct view, and space fixtures so beams overlap for an even field. Start by measuring the target’s width and height, choose a beam angle that roughly matches the object’s subtended angle, and add shields or louvres to block sightlines into bright sources. Use multi-source approaches — cross-lighting, fill fixtures, or diffusion lenses — to spread light smoothly over large surfaces. Nighttime commissioning with temporary setups and incremental dimming lets you evaluate glare and fine-tune aim and optics before finalizing the install, avoiding costly rework and delivering a consistent, glare-free result.
The idea of treating controlled brightness on architectural surfaces as a design medium traces back decades of lighting research and practice.
Glare-Free Architectural Lighting Design Thoughtful planning of brightness values on building surfaces should be treated as a design element — a principle long recognized in architectural lighting studies. GLARE-FREE LIGHTING METHODS STUDIED BY MIT, 1925
Below is a quick comparison of common fixture types and how they affect hot-spot potential, to help you pick the right hardware for glare-free uplighting.
| Fixture Type | Key Attribute | Typical Recommendation |
|---|---|---|
| Shielded Spotlight | Narrow beam + integrated shield | Ideal for trunk and column accents; add louvres or snoots to conceal the source |
| Well Light (In-ground) | Low-profile housing + wider spread | Great for broad facades or tree bases; pair with diffusers for softer edges |
| Shielded Flood | Wide beam + directional visor | Useful for wall washing when mounted at the correct distance and height |
This comparison shows that shielding and correct beam choice are the primary means to prevent hot spots, and that fixture form factor determines suitable placement and use.
Which Fixture Selections Reduce Hot Spots and Glare?
Choose shielded fixtures, the right lenses, and diffusers to control beam edges and keep the source out of direct view — that’s the quickest way to reduce hot spots. Warm, high-CRI LEDs render materials naturally while appearing less harsh to the eye. Adjustable, shielded spotlights let you tune beam spread from tight to medium; diffused well lights give softer transitions under canopies. Typical LED outputs depend on application — low-lumen narrow spots (100–300 lm) work well for small trunks, higher outputs suit larger facades — always combined with shielding to avoid direct sightline glare. Pick IP-rated fixtures for outdoor use so optics remain stable and beam patterns don’t degrade over time.
In short, fixture choice is about optics, shielding, and lumen management. When those three align, you’ll need less field dimming and the scene remains dramatic without becoming uncomfortable for viewers or passing traffic.
What Placement and Beam Angle Techniques Ensure Even Light Distribution?
Placement and beam-angle planning come down to geometry: match the beam angle to the object width at the fixture-to-target distance so the beam covers the subject evenly without gaps or concentrated cores. A practical rule is to use a 20–30° beam for medium trees and a 40–60° beam for wide facades when mounted at moderate distances. Space multiple fixtures so their beam edges overlap by about 10–20% to prevent striping and hotspots. Cross-lighting from two sides at complementary angles smooths tonal gradients and enhances texture while avoiding bright cores. During commissioning, dimming and adjustable mounts let you fine-tune spill and intensity to balance the field and protect sightlines from windows or neighboring properties.
Night testing and iteration reduce guesswork; understanding beam geometry prepares you for tree-specific strategies like moonlighting and cross-lighting that produce more natural results.
| Fixture Selection | Beam Angle | Shielding |
|---|---|---|
| Tight Spotlight | 10–25° | Recommended: louvre or snoot |
| Medium Flood | 25–45° | Optional: wing shields |
| Wide Wash | 45–90° | Use a full visor to control spill |
What Are Effective Tree Uplighting Techniques for Different Tree Types?
Trees come in many shapes, and each needs a tailored approach: small ornamentals, tall canopy trees, and multi-trunk specimens each call for different beam spreads, fixture counts, and mounting strategies to look natural and avoid hotspots. Small ornamentals often need a single, low-output spotlight with a medium beam to capture trunk and lower canopy. Tall trees usually require multiple fixtures — base spots plus moonlighting or elevated fixtures — to evenly illuminate height without bright bands. Multi-trunk trees benefit from cross-lighting, where two or more fixtures from different azimuths model the trunks and reduce single-source hotspots. Plan for seasonal changes: place fixtures so the scene works in both full leaf and bare-branch conditions for balanced year-round lighting.
Low-voltage LED spotlights with adjustable optics and dimming capability make seasonal tuning and maintenance straightforward, preserving the intended composition as plants grow.
How Does Moonlighting Create Natural Canopy Illumination?
Moonlighting mounts low-intensity fixtures high in a tree canopy and aims light downward to mimic moonlight. The result is soft, dappled illumination with gentle shadows on paths and seating areas. This technique uses wider beams at lower lumen outputs to avoid bright ground spots and to create a gradual falloff that reads as ambient light rather than theatrical accent. Because fixtures are elevated, careful mounting and wiring are necessary to keep hardware unobtrusive and serviceable. Moonlighting integrates beautifully into layered landscapes, filling gaps and adding depth without competing with lower uplights or facade lighting.
Studies and field experience consistently show moonlighting and inside-the-canopy uplighting work well for broad-leaved, large trees when the goal is natural-looking illumination.
Uplighting Techniques for Large Trees Field tests and perception studies suggest moonlighting and in-canopy uplighting are effective methods for large, broad-leaved trees, producing natural spatial cues and pleasing shadow patterns. A visual perception effect assessment of some large and broad-leaved trees under different lighting arrangements, Ç Sakıcı, 2014
Paired with ground-based uplights, moonlighting softens contrasts and fills visual gaps, creating a balanced nightscape that reads as both dramatic and livable while minimizing glare for neighbors and occupants.
What Is Cross-Lighting and How Does It Add Depth?
Cross-lighting positions two or more fixtures around a tree or architectural element so beams intersect and model the subject from multiple angles. This reduces single-source hotspots and reveals three-dimensional form. Typical geometry spaces fixtures roughly 90–120 degrees apart, with complementary beam angles to avoid overlapping bright cores. Cross-lighting emphasizes texture and trunk complexity for trees and sculpts architectural relief by creating controlled shadowing that separates planes and highlights depth. Use cross-lighting for multi-faceted subjects like multi-trunk trees, cornered columns, or recessed entries where single-direction uplighting would flatten the form.
Cross-lighting pairs well with fill fixtures and moonlighting to build layered scenes where each light contributes to an even, sculpted composition without glaring points.
How Do You Design Architectural Uplighting to Highlight Home Features?
Architectural uplighting starts with material assessment and a decision about desired drama. Wall washing works for broad, smooth planes; grazing emphasizes textured stone; targeted spotlights highlight columns and cornices. Control beam edges and spill to prevent hot spots and reduce glare onto neighboring properties. For stucco or smooth facades, wider beams mounted at a distance produce even coverage. For stone or brick, place narrow grazing fixtures close to the wall to reveal texture and three-dimensional character. Choose warm color temperatures for masonry and stone to preserve a natural look and reduce skyglow compared with cool whites.
Good architectural lighting also respects sightlines from the street and nearby windows, using shields and precise aiming to keep light where it’s wanted and away from occupants.
Introductory table comparing architectural techniques and their attributes:
| Technique | Ideal Beam Spread | Mounting Location |
|---|---|---|
| Wall Washing | 45–90° | Ground or low-mounted at distance for even coverage |
| Grazing | 10–30° | Very close to the wall at a low angle to emphasize texture |
| Spotlighting | 10–40° | Base offsets for columns or hidden soffit mounts for accents |
What Are Wall Washing and Grazing Techniques for Facades?
Wall washing uses soft, wide beams to light large facade planes evenly, reducing contrast and highlighting color without dramatic shadows — it’s ideal for smooth finishes. Grazing places narrow-beam fixtures very close to textured surfaces so shallow-angle light skims the material, amplifying relief and shadow for a tactile, sculpted feel. Mounting height and distance matter: wall washing benefits from lower mounts placed farther from the surface to allow beams to blend, while grazing needs close placement and narrow optics to avoid uneven banding. The choice depends on the architectural intent — subtle uniformity or pronounced texture — and both should be tested on-site to ensure consistent, hot-spot-free results.
On-site testing shows how mortar joints and shadow lines respond to grazing and whether wall washing produces unwanted striping; that testing phase informs final fixture selection and commissioning to preserve effects over time.
How Are Columns and Pillars Elegantly Uplighted?
Columns and pillars usually look best with narrow-beam spotlights placed at the base or slightly offset to reveal roundness and vertical detail without casting glare into nearby windows or walkways. A small offset (a few inches) avoids a flat silhouette and reveals curvature; for square columns, multiple small-angle fixtures or a single carefully aimed medium beam creates crisp modeling without hotspots. Pair subtle uplighting with low-level downlighting from eaves or sconces to balance vertical emphasis and reduce stark contrasts that can produce glare. Dimming and adjustable optics let the designer fine-tune intensity and edge softness so columns read as elegant anchors rather than glaring beacons.
These placement templates guide fixture selection — sealed, shielded spotlights with adjustable mounts and warm color temperatures preserve material fidelity and keep sightlines comfortable for occupants.
What Benefits Does Professional Uplighting Provide for Residential and Commercial Properties?
Professional uplighting delivers a visible aesthetic lift, improved safety, energy savings, and long-term serviceability that DIY attempts often miss. Designers integrate optics, siting, and controls to create consistent, glare-free scenes that boost curb appeal and nighttime usability. A well-planned system stages visual hierarchy to increase perceived property value while lighting steps, pathways, and perimeters to reduce accident risk. From a technical side, professional installs prioritize energy-efficient LEDs, low-voltage transformers, and smart controls that optimize runtime and lower operating costs while enabling quick scene changes for events or security. With maintenance and warranty programs, professional services protect the original design intent as plants grow and surfaces age.
Property owners get turnkey service: design, licensed installation, and follow-up. Natural Concepts delivers licensed crew leaders, satisfaction guarantees, and white-glove installation to translate design into reliable performance.
Key professional uplighting benefits:
- Curb Appeal: Thoughtful lighting highlights architecture and landscaping for stronger first impressions.
- Safety & Security: Directed illumination reduces dark zones and highlights entries and steps to lower accident risk.
- Operational Savings: LED fixtures and smart controls cut energy use and lengthen maintenance cycles.
These benefits show why professional design and installation are an investment: they turn technical choices about optics and placement into measurable improvements in aesthetics, safety, and cost control.
Introductory metrics table linking benefits to measurable outcomes:
| Benefit | Measurable Attribute | Typical Outcome |
|---|---|---|
| Energy Efficiency | LED wattage vs halogen | 50–70% lower operating watts |
| Safety | Illuminated pathway coverage | Fewer trip hazards; better visibility |
| Aesthetic Value | Perceived curb appeal | Stronger nighttime presentation in listings |
How Does Uplighting Improve Safety and Security Outdoors?
Directed uplighting improves safety by lighting pathways, steps, and uneven surfaces so people can move safely after dark, reducing fall risk and improving awareness. For security, accenting entry points, approaches, and perimeter zones increases visibility for cameras and passersby, deterring opportunistic trespass without resorting to harsh floodlighting that creates glare. Integrating motion sensors and smart controls keeps lights subtle during quiet hours and increases illumination when activity is detected, balancing privacy and responsiveness. Professional installations by licensed crews ensure circuits, mounts, and light levels meet electrical safety standards and perform reliably over time.
The net effect is an outdoor environment that feels welcoming and secure, and commissioning verifies coverage and sightlines to reduce blind spots and prevent glare into occupied spaces.
What Energy-Efficient Technologies Are Used in Modern Uplighting?
Modern uplighting centers on LEDs, low-voltage transformers, and smart-control systems that enable scenes, schedules, and remote dimming to cut energy use and extend fixture life. LEDs offer long service life, high efficiency, and selectable color temperatures — warm whites (2700–3000K) are common for residential settings to preserve natural tones and reduce light pollution. Smart controllers and timers make seasonal adjustments and scene programming simple, preserving design intent while reducing runtime. Dark-sky-conscious optics and careful shielding limit upward spill and local skyglow, aligning striking lighting with environmental care.
Together these technologies create systems that are visually compelling and operationally efficient; professional installers include specification and commissioning to ensure components work together as intended.
How Does the Natural Concepts Design Process Ensure Stunning, Hot Spot-Free Uplighting?
Our process is structured to deliver glare-free uplighting that meets your goals. We begin with a site survey to document sightlines, materials, and planting structure, then create mockups or photomontages to test beam spreads and intensity in context. Fixture selection focuses on shielded optics, appropriate lumen outputs, and warm color temperatures matched to materials. Installations use adjustable mounts so commissioning can refine aim and output. Final commissioning includes nighttime testing, dimming calibration, and a client walkthrough. Natural Concepts backs work with maintenance options and a satisfaction guarantee managed by licensed crew leaders to preserve long-term performance.
This step-by-step approach turns design intent into reliable reality. For clients who want to move forward, we provide a free quote and consultation to begin the site-specific process.
What Steps Are Involved in Custom Uplighting Design and Installation?
The custom workflow follows clear, client-facing stages: site analysis and goals discovery, design mockups and fixture specification, trial placement and on-site testing, final installation and commissioning, and ongoing maintenance and warranty verification. During site analysis we document architectural lines, plant layouts, viewing angles, and safety priorities to inform optics and placement decisions. Mockups and photomontages let clients preview night scenes and choose between subtle and dramatic approaches before committing to hardware. Nighttime trialing validates beam spreads, uncovers potential hot spots, and allows dimming tweaks; once finalized, the team completes wiring, sealing, and calibration, and hands over programmed control scenes plus maintenance guidance.
This transparent, phased process minimizes rework and ensures the finished installation delivers consistent, glare-free results that match the owner’s aesthetic and functional goals.
How Does Natural Concepts Incorporate Advanced Fixture Technology and Smart Controls?
We specify advanced LED fixtures with adjustable optics, high CRI, warm color temperatures, and shielded housings so beams can be shaped precisely and glare minimized. Those fixtures pair with smart controllers to create scenes, schedules, and remote adjustments that conserve energy and maintain consistency. Smart controls let us dim during low-use hours, boost intensity for events, or link lighting to security sensors for responsive illumination — preserving design while reducing runtime. Our licensed crew leaders commission scenes on-site and provide maintenance plans so beam patterns, shielding, and control settings remain effective as plants and surfaces change, keeping the original vision intact.
If you’re ready for a professional, hot spot–free uplighting solution, request a free quote or consultation and we’ll start a site-specific review to translate these technical choices into a tailored plan.
Frequently Asked Questions
What are the key benefits of using uplighting in outdoor spaces?
Uplighting improves outdoor spaces in several ways: it enhances aesthetics by highlighting architecture and landscaping, increases safety by lighting steps and paths, and extends usable outdoor hours after dark. Well-designed uplighting raises curb appeal and can make outdoor areas feel more inviting. Modern systems are energy-efficient — LEDs lower operating costs while delivering effective, attractive illumination.
How can I choose the right uplighting fixtures for my landscape?
Pick fixtures based on the specific features you want to light. Consider size, texture, and the type of trees or architectural elements involved. Narrow-beam spotlights work well for columns and small trees; wider fixtures suit large canopies. Color temperature matters too — warm tones are generally more welcoming for homes. A professional designer can match optics, lumen levels, and shielding so the fixtures achieve your visual goals without creating glare or hot spots.
What maintenance is required for uplighting systems?
Routine maintenance keeps uplighting performing well: clean fixtures to remove dirt, check seals and housings, inspect wiring and connections, and make seasonal adjustments as foliage changes. Regular inspections help spot issues early. Many pros offer maintenance plans with scheduled checks and adjustments to preserve both the look and the function of the system.
Can uplighting be integrated with smart home technology?
Yes. Modern uplighting systems can be tied into smart-home controllers so you can adjust brightness, schedule scenes, or operate lights from a phone or voice assistant. Integration adds convenience and energy savings and can link lighting to security systems so illumination responds to motion or other triggers.
What are some common mistakes to avoid when installing uplighting?
Frequent mistakes include poor fixture placement that causes glare, mismatched beam angles that create hot spots, and overlooking seasonal foliage changes. Not using shields or aiming fixtures properly can make light sources visible and uncomfortable. Thorough site analysis and nighttime testing before final installation prevent these issues.
How does seasonal change affect uplighting design?
Seasonal foliage affects how light distributes through a landscape. In spring and summer full canopies can soften or block beams, while bare branches in winter reveal different textures. Designers account for these shifts by placing fixtures and selecting optics that work across seasons and by planning for periodic adjustments as plants grow.
Conclusion
Uplighting is a powerful tool for transforming outdoor spaces — it enhances beauty, boosts safety, and extends nighttime usability when executed without hot spots or glare. Using the techniques described here and working with experienced professionals ensures a refined, glare-free result that highlights your home and landscape. To see what uplighting can do for your property, request a free quote or consultation and we’ll review your site and recommend a plan that matches your goals.